We would be covering the evolution of overall infrastructure design to this new concept known as “Serverless” architecture.
If we go by the literal meaning, it sounds like a service that can serve without a server.
But that’s not the entire case here, When you deploy the application using Serverless Architecture it means that you do not own the server but the layer to allow your service to serve.
If compare this to our daily lives, You get services like water, electricity delivered to your place. You use those services as per your need and get billed based on usage. You don’t concern yourself on how it’s reaching you or what is the underlying architecture to get that service reached to you.
Setting up AZ CLI
First thing first, Let’s set up Azure CLI access so that we can run all the commands using the CLI functions and without browsing through UI. It’s not necessary to have CLI access, You can do the same functions using UI as well.
In my case being a MAC user, the following is the command that we need to run in MAC.
brew update && brew install azure-cli
az login
If you are using the AZ without any subscriptions configured in Azure. You can use the following command to configure your account in Tenant mode.
az login --allow-no-subscriptions
For reference on installation of other Operating systems.
You would need an active subscription to get further in this lab. In case you don’t have, Kindly check this.
Creating a Resource Group

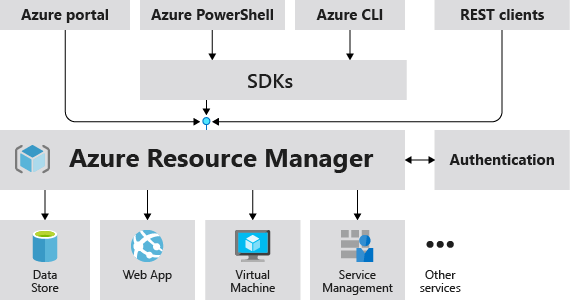
Azure Resource Manager is the deployment and management service for Azure. It provides a consistent management layer that enables you to create, update, and delete resources in your Azure subscription. You can use its access control, auditing, and tagging features to secure and organize your resources after deployment. So part of our lab, we first need to create a resource group for our serverless web app.
az account list-locations #list all the locations available as a region
az group create --location <YOUR REGION> --name <YOUR GROUP NAME> #create a resource group
bash$ az group create --location centralindia --name svr-less-web-app
{
  "id": "<<some-id>>>",
  "location": "centralindia",
  "managedBy": null,
  "name": "svr-less-web-app",
  "properties": {
    "provisioningState": "Succeeded"
  },
  "tags": null,
  "type": null
}
More details on Azure Cloud Manager are here.
Creating a Storage Account
Azure has a few ways you can create a storage account. In part of this article, we are going to create General-purpose V2 which would allow us to save blob, files, etc. onto the storage.
az storage account create
    --location <YOUR REGION>
    --name <YOUR STORAGE ACCOUNT NAME>
    --resource-group <YOUR GROUP NAME>
    --sku Standard_LRS
    --kind StorageV2
bash$ az storage account create --name datavizz --resource-group svr-less-web-app --sku Standard_LRS --kind StorageV2 --location centralindia
{
  "accessTier": "Hot",
  "creationTime": "2019-05-01T00:41:55.900609+00:00",
  "customDomain": null,
  "enableAzureFilesAadIntegration": null,
  "enableHttpsTrafficOnly": false,
  "encryption": {
    "keySource": "Microsoft.Storage",
    "keyVaultProperties": null,
    "services": {
      "blob": {
        "enabled": true,
        "lastEnabledTime": "2019-05-01T00:41:55.931850+00:00"
      },
      "file": {
        "enabled": true,
        "lastEnabledTime": "2019-05-01T00:41:55.931850+00:00"
      },
      "queue": null,
      "table": null
    }
  },
  "failoverInProgress": null,
  "geoReplicationStats": null,
  "id": "<<id>>",
  "identity": null,
  "isHnsEnabled": null,
  "kind": "StorageV2",
  "lastGeoFailoverTime": null,
  "location": "centralindia",
  "name": "datavizz",
  "networkRuleSet": {
    "bypass": "AzureServices",
    "defaultAction": "Allow",
    "ipRules": [],
    "virtualNetworkRules": []
  },
  "primaryEndpoints": {
    "blob": "<<endpoint details>>",
    "dfs": "<<endpoint details>>",
    "file": "<<endpoint details>>",
    "queue": "<<endpoint details>>",
    "table": "<<endpoint details>>",
    "web": "<<endpoint details>>"
  },
  "primaryLocation": "centralindia",
  "provisioningState": "Succeeded",
  "resourceGroup": "svr-less-web-app",
  "secondaryEndpoints": null,
  "secondaryLocation": null,
  "sku": {
    "capabilities": null,
    "kind": null,
    "locations": null,
    "name": "Standard_LRS",
    "resourceType": null,
    "restrictions": null,
    "tier": "Standard"
  },
  "statusOfPrimary": "available",
  "statusOfSecondary": null,
  "tags": {},
  "type": "Microsoft.Storage/storageAccounts"
}
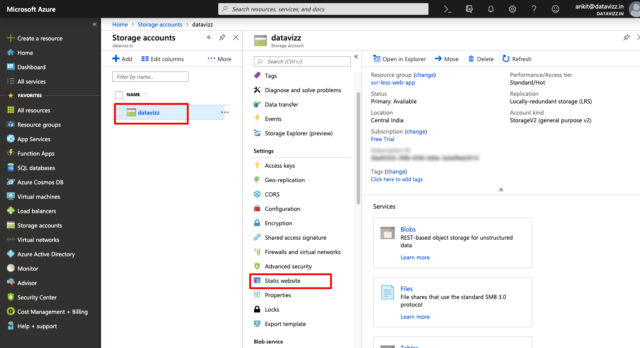
Now, We need to enable the Static website for this Storage account that we’d just created.
But before we enable the static website we need to enable the plugin in CLI in order to use the storage account as a Static website.
az extension add --name storage-preview
bash$ az extension add --name storage-preview
The installed extension 'storage-preview' is in preview.
Then we can run the below command to enable static website hosting.
az storage blob service-properties update
    --account-name <STORAGE ACCOUNT>
    --static-website
    --index-document index.html
bash$ az storage blob service-properties update --account-name datavizz --static-website --index-document index.html
{
  "cors": [],
  "deleteRetentionPolicy": {
    "days": null,
    "enabled": false
  },
  "hourMetrics": {
    "enabled": true,
    "includeApis": true,
    "retentionPolicy": {
      "days": 7,
      "enabled": true
    },
    "version": "1.0"
  },
  "logging": {
    "delete": false,
    "read": false,
    "retentionPolicy": {
      "days": null,
      "enabled": false
    },
    "version": "1.0",
    "write": false
  },
  "minuteMetrics": {
    "enabled": false,
    "includeApis": null,
    "retentionPolicy": {
      "days": null,
      "enabled": false
    },
    "version": "1.0"
  },
  "staticWebsite": {
    "enabled": true,
    "errorDocument_404Path": null,
    "indexDocument": "index.html"
  }
}
Using UI, You can do it as per the below path.

More details on Azure Storage are here.
Deploying Website with the content
We need to take our content and deploy it on Azure Storage which we just created.
az storage blob upload-batch
    --source <SOURCE FOLDER>
    --destination $web
    --account-name <STORAGE ACCOUNT>
bash$ az storage blob upload-batch --source . --destination $web --account-name datavizz
Accessing Website once it’s deployed
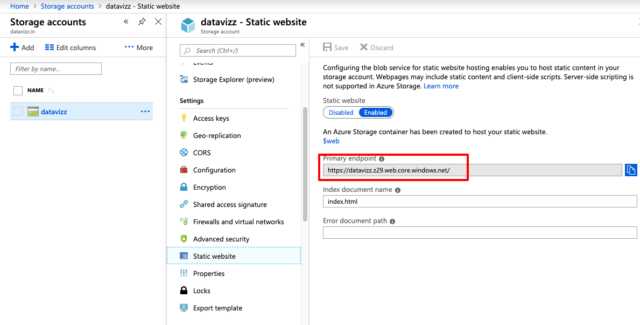
Every Storage account gets an endpoint assigned that can be accessed over HTTP. You can find the endpoint address from the following location.

Further, you can customize this to be configured with a custom domain or connect this to your own DNS directly.
If you’re looking to see how Serverless Application design could make an impact in your organization, We are a Cloud-Native Application Development Company, we’d love to talk.


